Get started
Quickstart: your first panel
This walkthrough builds a small panel end to end. By the end you will have managed custom properties on a target and a generated Blender panel that drives them.
Before you start
Install and enable the extension first — see Installation. By default the PropUI editor appears in the 3D Viewport sidebar (press N to open the sidebar, then look for the PropUI tab). See Finding the editor if you do not see it.
1. Choose where properties live
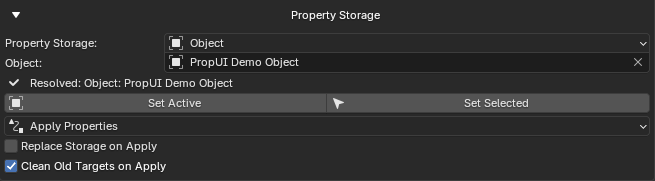
Open Output Setup → Property Storage and pick a storage target. This is the default owner for the custom properties PropUI manages.
For a first try, an Object target is the easiest:
- Set the storage type to Object.
- Use Set Active to fill it from the currently active object.
- Confirm the Resolved label shows a valid owner.
Tip
Storage targets range from Object and Bone to Material, Scene, Mesh Data, and many more. See the full list in Storage targets.
2. Add a few entries
In the Entry List, press Add to create an entry, then configure it in Selected Entry.
Try adding:
- A Float entry — give it a clear Label and a Property ID like
strength. - A Boolean entry — for an on/off toggle.
The Property ID is the actual custom-property key created on your storage target. Labels are what users read; Property IDs are what Blender stores.

3. Put entries into the layout
Entries do not appear in the panel until they are in the Generated Layout.
- Select an entry and press Add in Generated Layout to import it, or
- Use Tools → Import to pull the whole Entry List in at once.
Two layers, on purpose
The Entry List is what you author; the Generated Layout is what gets built. They are intentionally independent — see How PropUI works.
4. Arrange the layout
Now shape the panel:
- Group two entries into one row with the group left / right buttons to make a shared row.
- Add a sub-panel with Add Sub-Panel and move rows into it.
5. Name and place the panel
In Output Setup → Generated UI Identity:
- Set the Panel Title.
- Set the Sidebar Tab (the category the panel appears under).
In Visibility, confirm Generated UI Lives In and the sidebar/properties location are what you want.
6. Generate
Press Generate UI (or the G shortcut while the editor is focused).
PropUI now:
- Creates/updates the managed custom properties on your storage target.
- Writes the generated Python UI script.
- Registers the panel classes.
- Shows the generated panel.

7. Use it like a native panel
Your generated panel behaves like any built-in Blender panel. Adjust the values and they write straight to the custom properties on your target.
You don't need the editor running
The generated panel is stored in the .blend and keeps working when the
PropUI editor is closed. You can also Export .py Files ZIP to get a
portable script — see Import / Export.
Just the properties, no panel
If you only want to create or update custom properties without building a panel, use Apply Properties instead of Generate UI. See Output Setup.
Where to go next
-
Understand the model
-
Shape the layout
-
Show it conditionally
-
Try a real example